How to Send My Line Art to Sketchbook Without Losing Quality
I wanted to share some tips with you all well-nigh how I create scans/pictures of my art and edit them in Photoshop. Below I walk you through the unabridged process I apply to set up my images to brand high quality prints. Don't forget to Share, Tweet or Pin this commodity if y'all find information technology helpful!
Photographing Your Fine art
Almost of my fine art is too big or awkward for my A4 scanner, so I photograph information technology with my Nikon Coolpix P7800. Pretty much any digital camera volition practise as long as you make sure to prepare it to the highest quality & resolution. This amazing video past Tyler Stalman & Jason Eng created for Saatchi Online explains perfectly how to take practiced pictures of your art.
Using a tripod (or some other manner to stabilise your camera) is essential. I attach my artwork to the wall with Blu Tack or picture hanging strips. I utilise a spirit level to ensure it is completely straight. I also make sure my tripod is leveled and the camera is straight. The more authentic you can be most this, the less you will have to 'gear up' in Photoshop in terms of distorting the picture to make it fit.
I have a window on the left side of the wall which throws calorie-free, and so I use a simple soft box low-cal pointing at the painting from the right. You are trying to reach equal soft lighting on the whole painting, no direct harsh light or shadows.
Using manual focus if your camera allows it is helpful. Zero is more annoying than loading the pictures onto your computer only to discover that they are not in focus or not everything is in equal focus.
Scanning Your Art
If your art is relatively flat and fits on your scanner it is preferable to use this method. You won't be at the mercy of varying lighting atmospheric condition and a scanner will get great detail and every bit will exist in focus.
Before scanning ensure the resolution is set to 300ppi. Depending on your scanner you lot may need to adjust the brightness and contrast. From the point of view of being able to suit later in Photoshop, I prefer a scan that is slightly on the dark side over one that is too light. Adjust the brightness & contrast sliders and keep previewing until the preview matches the colours, detail & contrast of the original artwork. If you can, salvage these settings as a new profile so yous tin can speedily access them next time.

On the left the default scanner settings, on the right with brightness & contrast adjusted. The adjusted scan is much more true to the original artwork. The default loses a lot of particular past being too brilliant and the colours are washed out.
Adjusting Your Art In Photoshop
I apply Photoshop CS2, merely whatsoever programme that allows you to adjust these settings will practise. Editing in Photoshop is especially good for when you've photographed your art.
Offset I want to straighten up my art slice and make sure it fills up the whole canvas. I utilize the Rectangular Marquee tool to select as close around the artwork as I tin, without cutting whatsoever of it off. Then I crop the prototype (Image > Crop). This may mean that on some sides the background all the same shows. To fix that, I apply the Transform tool (Ctrl+T), and right click on the paradigm and select Skew. I then elevate the corners out where necessary. If you need to rotate your canvas with the transform tool (you shouldn't have to if you followed the steps for straightening the artwork on the wall and leveling your tripod – it's really worth doing!) do that before skewing.
Now we make the magic happen. Commencement become to Paradigm > Adjustments > Auto Levels. If it looks good, go on it. If it looks "WHOA TOO MUCH!" you lot tin fade the outcome by going to Edit > Fade Auto Levels and select a per centum. Then go to Image > Adjustments > Automobile Dissimilarity. Fade once again if needed. Finally we use Image > Adjustments > Auto Color (and Fade).
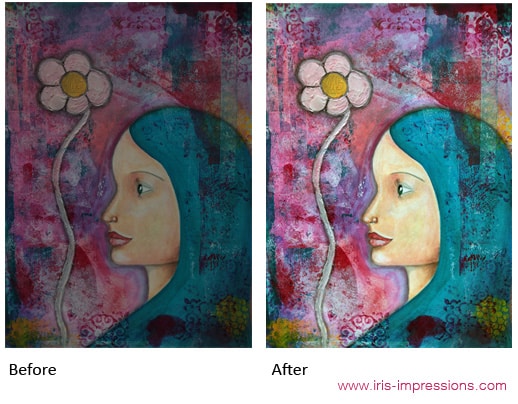
How much y'all employ these 3 tools depends on how true to life the pictures/scans you took are. Sometimes I hardly need to change anything, other times it makes a huge difference.
Relieve your moving picture at a high setting. I tend to go for File > Save Equally and so select jpg at Quality 12. In that location are other file types with less compression, but I've plant there is no visually noticeable data loss with this setting and it keeps file sizes manageable.
Voila!
Now yous've got your hi-res digital master to make prints of forevermore, even if you sell the original!
If you follow this tutorial please let me know in the comments, I'd love to know how you got on. If you have any questions I'll be happy to answer them!
Source: https://iris-impressions.com/how-to-photographscan-your-art-and-prepare-it-for-high-quality-art-prints/
0 Response to "How to Send My Line Art to Sketchbook Without Losing Quality"
Post a Comment